
Understanding DNS
When you type in a domain name, it has to connect with your web hosting or email service. For this to happen, the domain name must be registered and pointed to the correct servers, which occurs through the Domain Name System (DNS). The Domain Name System translates hostnames such as www.melbourneit.com.au into IP addresses, which are assigned to servers, that hold data information such as a website or email service.
The diagram below depicts this process:
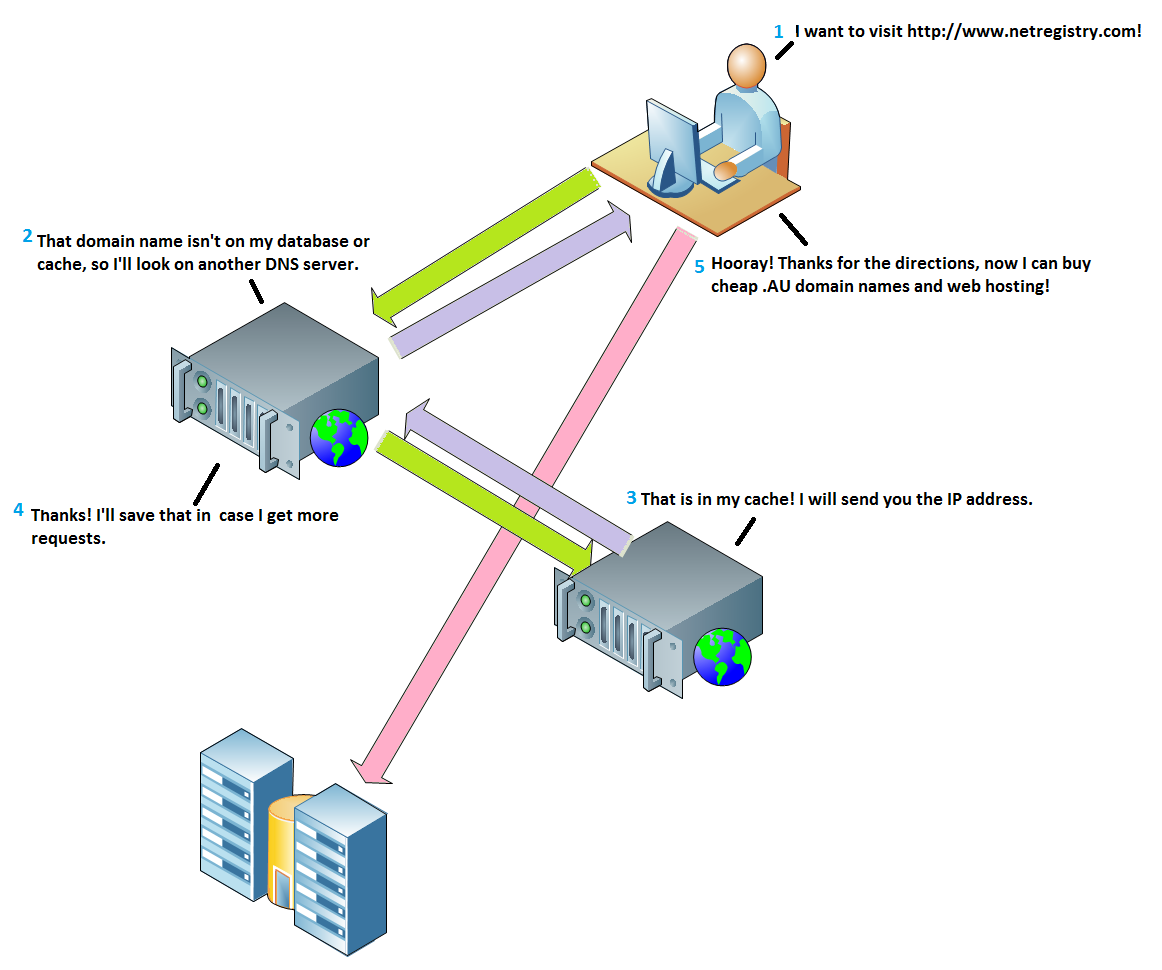
In order for a domain name to find its corresponding website or email service, it must be delegated to a name server. Every name server contains a zone file, which contains zone records. These are used to translate domain names into IP addresses, which represent the computer servers that host your website or email service.
Why isn't the domain name I'm typing in connecting to a website?
There are several reasons why a domain name isn't connecting to a website or email service. These can include:
- The domain name has expired
- The domain name doesn't exist/has been misspelled
- The domain name is delegated to a name server that doesn't hold accurate zone files
- The domain name is pointed to the correct service but something is wrong with the service
For a domain name to open a website, all three parts (the domain, name server/zone records and the website/email service) must be functioning correctly and connected to one another.
My domain name isn't loading my website, help!
If you are currently experiencing some issues with your domain name and you believe it may be DNS related, follow the steps below to ensure everything is setup correctly.
- Perform a Whois lookup against your domain name.
- Has it expired?
- Who is the Registrar?
- Is it delegated to the correct name servers? - If it's delegated to the wrong name servers, modify your domains name servers.
- Double check that your zone file has accurate zone records.
If you're unsure of what the problem might be, don't hesitate to contact our support team, who will be able to investigate your issue further.
What does each zone record do?
For an email or website hosting service to function alongside a domain name, the domain name requires a zone file. Within your domains zone file, there are several different kinds of zone records and each record serves a specific function. Below is a table describing each type of record that exists within your domains zone file and how you can use them. You do not need to add all of these to your domain for it to work, however you may find you need to add extra records later down the track.
| Record Type | Description |
|---|---|
| SOA | A Start of Authority record is a special resource record included in every zone file. The SOA record supplies certain basic information about the zone including the zones primary authoritative server. |
| A | A records are used to direct your domain name (eg: www.mywebsite.com) to to IPv4 IP addresses – which then directs the user to your website. IPv4 IP numbers look something like this: 122.140.201.66 |
| AAAA | AAAA records are used to direct your domain name (eg: www.mywebsite.com) to IPv6 IP addresses – which then directs the user to your website. IPv6 IP numbers look something like this: 3ffe:1900:4545:3:200:f8ff:fe21:67cf. They were introduced when the internet ran out of IPv4 combinations. |
| CNAME | CNAME records (also called Canonical records) are simply alias records that point to domain names, rather than an IP address (as A records do). They are usually used to point a domain to a service, like Tumblr, Gmail or WordPress, where user accounts are sub domains or directories of the service. When users change the IP address associated with their A record, all CNAME records that point to that A record update automatically. |
| MX | MX records are used to direct a domain name to an email exchange server. MX records must always point to domain names which belong to another zone record and not an IP address. The IP address is always resolved by the A Record. |
| TXT | TXT and SPF zone records allow the owner of a domain to specify which IP addresses are allowed to send emails using their domain. |
| SRV | An SRV record is a specification of data in the DNS, defining the location of a server for specified services. For more information, click here. |
| NS | The NS records contain the name server information for the zone they exist on. |
Depending on what type of subscription service you have with us, the tools you use to manage your domains zone file may differ. If you have any issues updating or editing your zone records, don't hesitate to contact our customer service team for assistance.
Updated 4 months ago