Setting up Cloud email in Outlook
Setting up your cloud email in Outlook is pretty straight forward, however in order to make the process streamlined make sure you have purchased a cPanel or Cloud hosting plan, have created an email account and have all email software information readily available. If you have been migrated from our other hosting infrastructure you will be using Cloud hosting.
The guide follows settings for a POP configuration which is the most common type of email setup, however if your interested in using an IMAP setup please follow the guide, but refer to the table at the bottom of this article for settings pertaining to IMAP.
Step One: Create an email account
Before you can setup your email in Outlook, make sure you have created a mailbox. If you haven't done so yet have a look at our guide for creating mailboxes in Cloud & cPanel.
Step Two: Adding your email account to Outlook/ Changing email settings
Please Note: These instructions & picture are referencing Outlook 2013 however earlier versions of Outlook follow a similar process.
Video Guide
To Add a brand new account:
- Open Outlook
- Click File
- Click Add Account
- Select the radio button Manual setup or additional server types
- Select the radio button POP or IMAP
To change the settings of an existing account: - Open Outlook
- Click File
- Click Account Settings, and then Account Settings again
- Select the mailbox you wish to edit, and then click Change
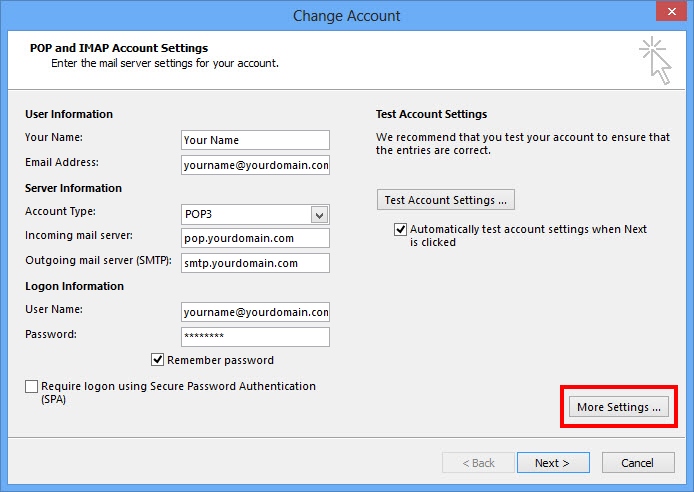
Once you have completed the above steps, you will see a screen similar to the one below. Below this screenshot, you will find a table containing all of the required information. Please use this table, to fill out the fields as per our screenshot.

| Settings | Information | Example |
|---|---|---|
| Your Name | Your name as you wish it to appear for your recipients. | Your Name |
| Email Address | Your full email address. | [email protected] |
| Incoming mail server | If you are using POP (most people will) use pop.example however if using IMAP please use imap.yourdomain.com | POP pop.yourdomain.com IMAP imap.yourdomain.com |
| Outgoing mail server (SMTP) | Enter our outgoing mail server. Please note that if you wish to send through our SMTP server it does require authentication.. | smtp.yourdomain.com |
| User Name | Your full email address | [email protected] |
| Password | Your mailbox password | *************** |
| Incoming Port | For POP the default port is 110 , however if using SSL the port is 995. For IMAP the default port is 143, however if using SSL the port is 993. | POP Normal = 110 SSL = 995 IMAP Normal = 143 SSL = 993 |
| Outgoing Port | Most ISP's tend to block port 25, so we recommend you use 587. | Non SSL = 587 SSL = 465 |
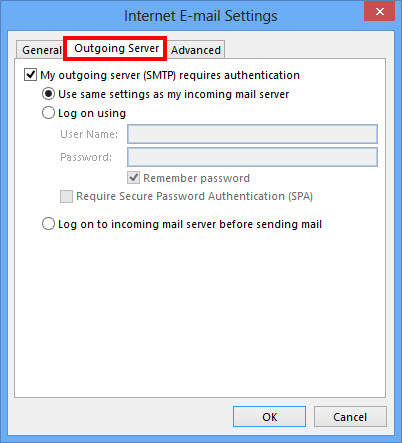
Once you have inserted this information, please click on More Settings, as highlighted in the above screenshot. This will open up a new window. Click on the Outgoing Server tab, highlighted in the below screenshot.
As per the below example, tick the box marked My outgoing server (SMTP) requires authentication, and select the bullet point Use same settings as my incoming mail server:

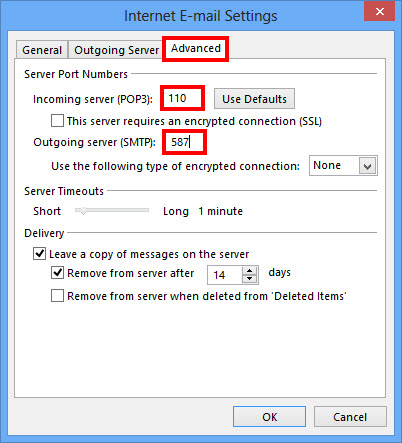
Once you have done this, please click on the Advanced tab, this will then switch to a screen similar to below. Please ensure the ports are set to 110 (for Incoming) and 587 (for Outgoing) as per the below example:

After you have done this, click OK to go back to the main settings screen. You can then clickTest Account Settings to double check everything is OK, or just click Next and then Finish.
Updated 3 days ago
