
How to change Android settings for Cloud email
Android is a mobile phone operating system created by Google which runs on many different devices on multiple brands. Setting up your cloud email on your android is easy! Android has various versions and interfaces so please be note, your phone may look different from the screenshots below.
The guide follows settings for a POP configuration which is the most common type of email setup, however if your interested in using an IMAP setup please follow the guide, but refer to the table at the bottom of this article for settings pertaining to IMAP.
Finding your email settings in Android
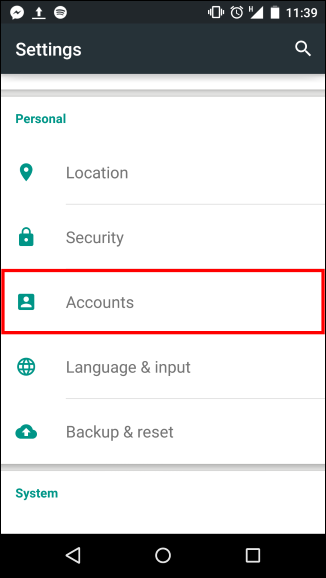
1. Go to Settings on your phone
2. Swipe down and click on 'Accounts'
3. Select Email
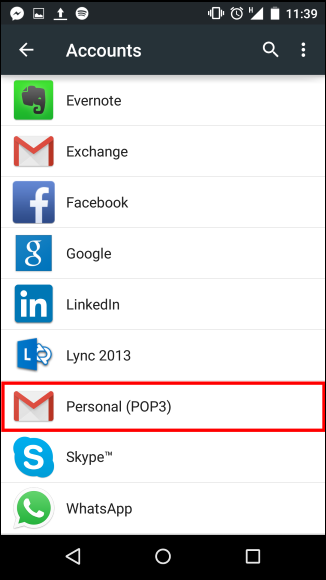
4. Here you should see a list of Email Accounts setup on your phone. Select the one you wish to edit.
5. Click on 'Account Settings' or 'Settings' ( May differ depending on what version of android you have)
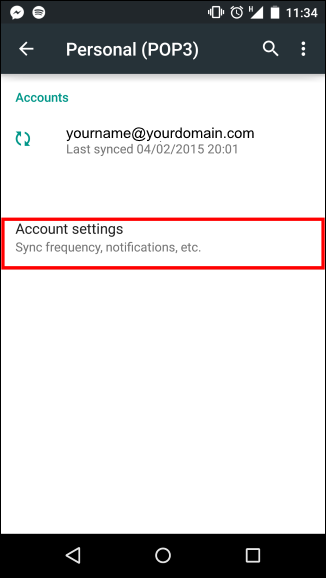
Next you will see a list of settings for your mailbox. We are after incoming and outgoing server settings, please be aware, if your using a Samsung Galaxy S5 for example you may have to click 'More Settings'.

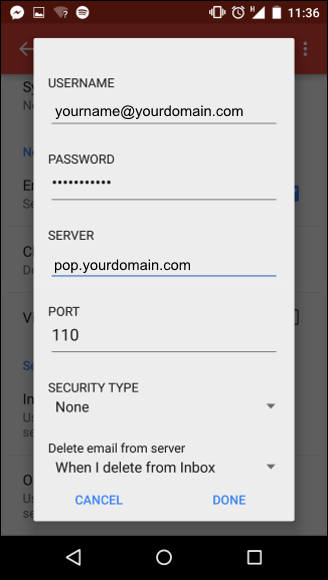
Incoming Mail server settings
- Tap on Incoming Settings.
- Your username will be your full email address. ([email protected])
- Ensure your mailbox password is entered in the password field.
- For the POP3 server enter pop.yourdomain.com and ensure the port is 110. Simply tap 'Done' after ensuring these settings are correct.
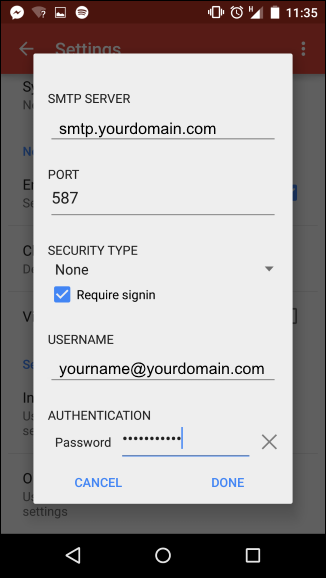
Outcoming Mail server settings
With your Outgoing Mail server you have a choice of using Melbourne IT's mail servers or your mobile carriers. Sometimes 3G/4G mobile carriers will force you to use their Outgoing mail server. For this reason if your unable to configure your Melbourne IT mail server to work on your device please attempt to seek support from you carrier. We have also observed being more common in remote areas of Australia.
- Tap on Outgoing Settings.
- For your SMTP server enter smtp.yourdomain.com and ensure the port is set to 587.
- Ensure the 'Require sign-in' checkbox is ticked.
- Your username will be your full email address. ([email protected])
- Ensure your mailbox password is entered in the password field.
Email Settings
| Settings | Information | Example |
|---|---|---|
| Your Name | Your name as you wish it to appear for your recipients. | Example Name |
| Email Address | Your full email address. | [email protected] |
| Incoming mail server | Your incoming mail server. | mail.yourdomain.com |
| Outgoing mail server (SMTP) | Enter our outgoing mail server. Please note that if you wish to send through our SMTP server it does require authentication.. | mail.yourdomain.com |
| User Name | Your full email address | [email protected] |
| Password | Your mailbox password | *************** |
| Incoming Port | For POP the default port is 110 , however if using SSL the port is 995. For IMAP the default port is 143, however if using SSL the port is 993. | POP Normal = 110 SSL = 995 IMAP Normal = 143 SSL = 993 |
| Outgoing Port | Most ISP's tend to block port 25, so we recommend you use 587. | Non SSL = 587 SSL = 465 |
Please Note: If your using 3G/4G internet provided by your Mobile Carrier. Occasionally they may prevent you from using us as your SMTP/Outgoing Mail server. In which case you will need to consult with your Mobile Carrier for your Outgoing Mail Server.
Updated 2 months ago